Monday, October 15, 2012

Front-End Troubles

Following the weekend with Jarred and getting the suspension done, I wanted to move on to rebuilding the front-end. My plan, of course, was to finish it over a weekend. Yea right.

My steering wheel transmitted some shimmy from about 45-60mph or more specifically when I could get it up to 60mph which required a nice smooth downhill. The forums suggested that perhaps the shimmy was from either the tie-rod ends, the knuckle bearings, or the tires. The tires will be changed later, but in the meantime a front-end rebuild will handle the other two possibilities.

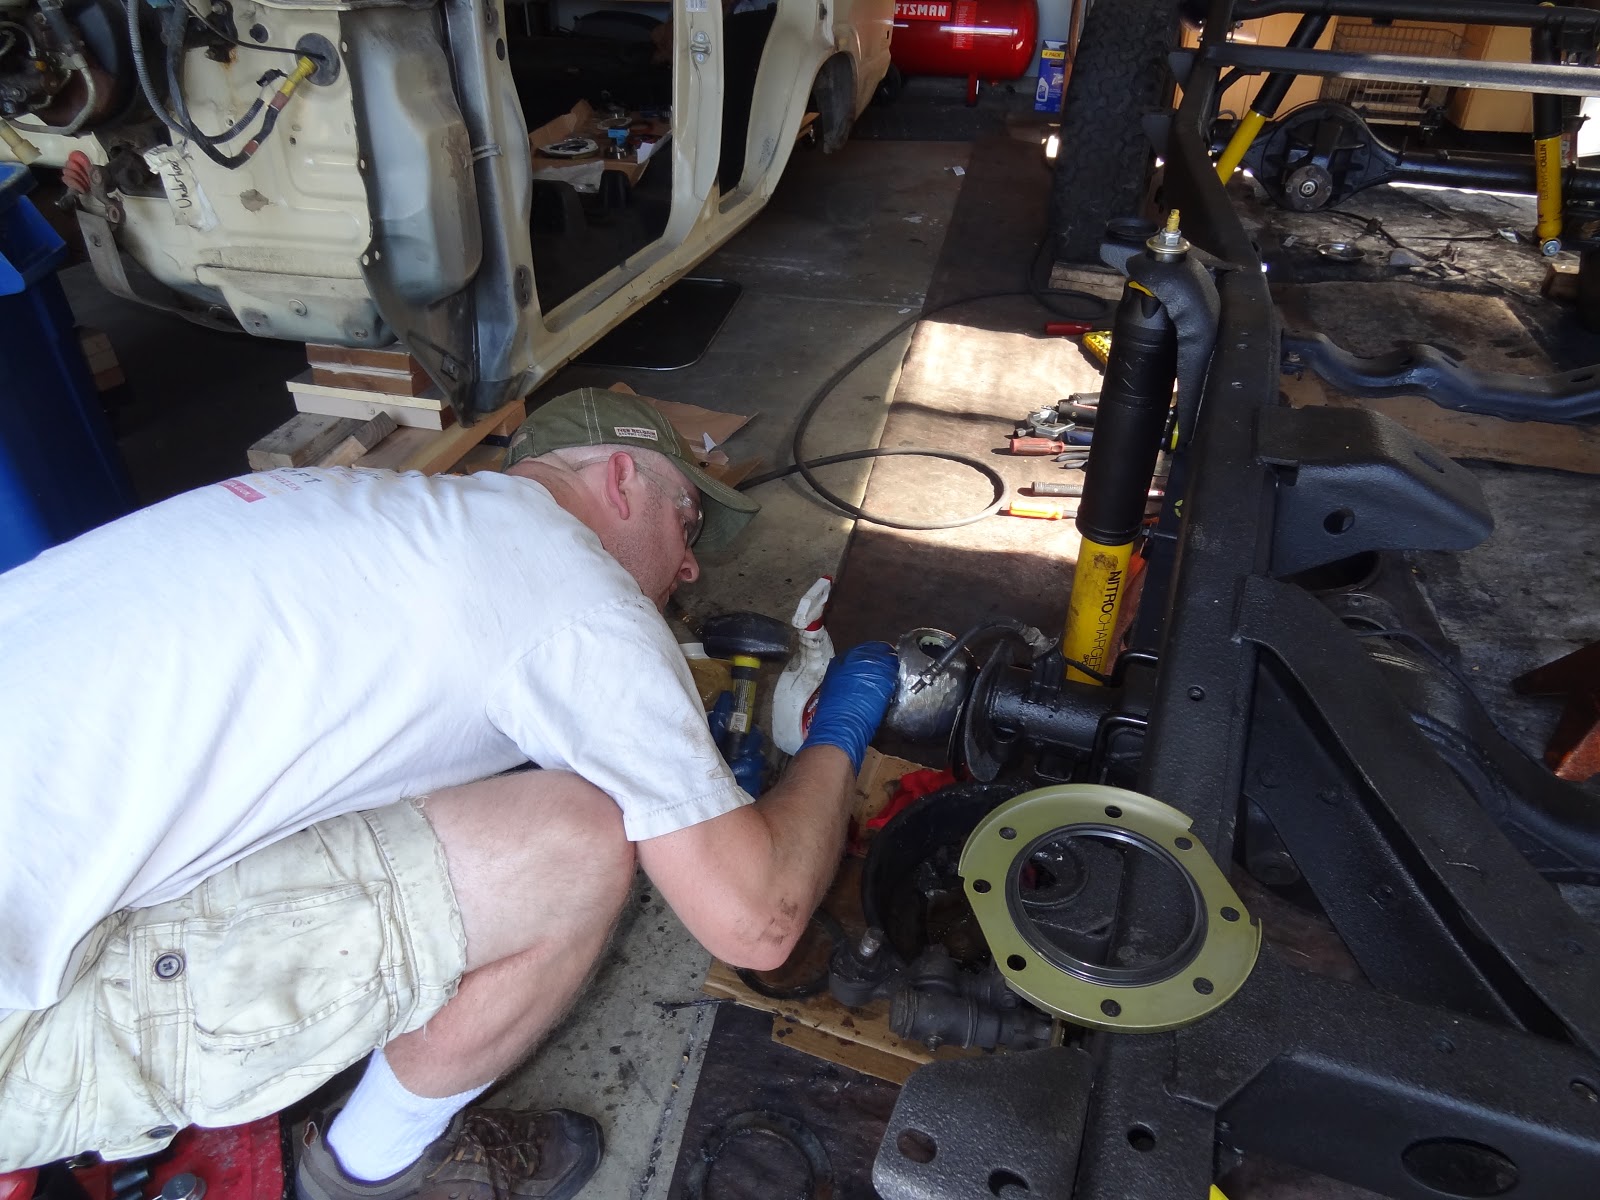
All the parts laid out for the front-end rebuild - wheel bearings, kunckle bearings, wheels seals, bearing races, birfield seals, gaskets, towels, disc rotors, brass drifts, towels, grease, gloves, towels, seal puller, brake cleaner, and some more towels. 
The passenger side tore down nicely. I put each of the bolts from each section - hub lockouts, hub, knuckle, steering arm, and brakes. All the parts cleaned up nicely. I used my favorite new paint - Rustoleum Grill Paint - flat black and good up to 1200F, which is 600F more than expensive caliper paint, yea, I'm smart.

The passenger side went together with little effort or trouble, but... I failed to realize the old bearing races that needed to be punched out and reinstalled with new ones, so I got to do the tear down all over again. Apparently, my sub conscience was not happy with the efficiency of my work and figured that I would benefit from doing the work all over again. Oh and since I failed to read all my forum-sourced directions, that seems familiar, I got to order new seals. 
Passenger side ready for new paint and bearings/seals. 
I was so clean. The picture must've been taken shortly after I started working that day because I was a mess, a complete mess. 


That wheel sure looks old. What to do, what to do. 
 After figuring out the passenger side the driver side was a breeze. 

The next update - a surprise visitor and a space gets cleared up in my garage: 


Tuesday, August 21, 2012

It Moves!

This past weekend I had some help. I am never the one to turn down good help, but this time was my buddy from high school - dare I say my oldest and best friend and yes, I am sadly old enough to use those two words in succession (oldest and best). I have had some much welcomed help in the past - Rob (x2) and Denny and each one was extremely fun and helpful, but it was this weekend that I've been thinking about for months. (Rob I think about your visits for months too, but usually for other reasons...)

I had my frame all painted - heavy duty anti-rush (that was later mostly removed b/c I messed it up), 2 coats of rubberized undercoating, and 2 coats of rust encapsulate (internal and external x2). My frame was ready to receive the axles yet again.

Prepping the rear axle - following rust converter. The garage was still clean... 
I got the front axle all rubberized. The rear got done with Jarred's help. Once the axles were all cleaned and painted it was time to move them back into place and put the $2k in suspension parts to work - and Jarred. Thank you Old Man Emu for your Medium Duty Lift Kit - thank you, I say after I had to pay you a ton of money, but thank you anyway.

We first tackled the front suspension. Thank you Jarred for reading the instruction for the greasable front shackle assemblies. Ah, yea, they're not that bad I thought. I'll admit my shame when Jarred immediately grabbed the instructions while I just looked at the box of parts. I would've gotten to the instructions after about an hour or two, but Jarred grabbed them right away and read through. Didn't I just do a blog about the importance of reading instructions? Geez.

We rolled the front axle out and secured the spring to the rear perch. The plan was to roll the
suspension back in and then secure the spring to the front perch - good plan and it worked.
Note the blue tape on Jarred's shoes - genius. 

We look so professional with the nitrile gloves. The toughest part was getting all the
packing/shipping tape off my brand new springs. 

Good thing we started the day with a healthy breakfast - donuts! 
The front suspension went on without a hitch - pretty much. We had some trouble aligning the front shackles, but with a little pushing and pulling we got the bolts to line up right. Again - Read Your Directions! Thanks Jarred for the reminder.

Whoo-freakin-Hoo! The front suspension is in place! No busted hands or fingers! 

The bushing in the shock was the toughest part of the front or rear suspension. 
Still working on inserting the bushing into the shock. Why can't they insert them from the factory?!
My hands still hurt. 
Finally! One down, three to go! 
I think we were flying by the time we finished the front. It didn't take too long. I was learning suspension geometry from Jarred. Things were good, but the day was getting long after the side-tracking from painting the rear axle. We trugged along though and I am so thankful.

I needed to run out for some bolts, so Jarred kept busy assembling the rear greasable shackles. Again, first things first - read the directions thank you very much. I get back from my bolt run and we're ready for the rear!

Well, by this time our little 4hr work session was quickly turning into a good solid 6hrs, so I'm feeling the pressure. I don't want to keep Jarred working on my truck all day when he and his wife flew out to see us. I wanted to make sure that we could still show them a good time. Jarred and his wife were more than willing to chill at the house. I guess a house without their kids is something of a vacation in itself, so no need to fuss - awesome! Jarred and I kept working. My pants are quickly becoming dirty and my professional looking blue nitrile gloves have long since been abandoned - ungloved hands always work faster right?

We got the rear suspension in place - good, moving along. We did have considerable trouble with the shackles this time. The directions, however often they were referenced, were not clear for the rear. I'd already called my parts guy for help once, so I didn't want to call him again and I know the forums are ripe with incorrectly installed shackles. After installing them twice incorrectly we finally got it figured.

So glad the body was off for the rear install! 
Sooo, how does this shackle go? Ah, we'll figure it out eventually. 
The shocks only extend so far which wasn't far enough. I guess Old Man Emu didn't expect
that someone would install their shocks without the added weight of a body. Once the
body gets installed the suspension will settle, but in the mean time - I had to do some
jumping on the rear to compress the suspension to get the shocks to mount. 
I think we started around 10am and had it rolling by 4pm - not too bad. My having to run for some bolts set us back a good 45mins and those damn rear shackles added at least an hour to the job, but not bad overall.

I honestly wanted to cry I was so happy. It would've easily taken me a good 2-3 weeks with the rate that I work to have done all that alone. I was happy to get it rolling, but I think I was more happy that I finally got to turn some wrenches with my oldest and best friend. The wives were happy spending time together at the house - they didn't rush us and in fact they often told me to stop worrying about me commandeering our day with my truck. What an amazing display of support from our wives. I am so thankful and so blessed. I only wish we could do it more often. Everything just seemed to fall into place. We had the tools we needed (mostly). We had the parts we needed (mostly). We had some wonderful photographers (thanks Babe) and we had the support we needed to get the job done. I couldn't be happier.

Jarred suggested we strap some buckets to the frame and ride it down the driveway. 
Here's the photo to summarize their trip and it's going to get framed. 
Every now and again you have an experience you know you'll always remember... Ah, we live too far away from our family. I love you guys.


Sunday, August 12, 2012

Make sure you read the directions

Before the wife and I left for home for the 4th of July I had a push to get the frame painted. I wire brushed and scraped and rust converted and rinse and repeated a few times over. We're good to go. Angie thought I should paint it in the garage, but I was hesitant. I knew (and still know) that she was right, but I didn't want to have to deal with protecting the garage from overspray, so I decided to spray it outside - it's just the frame, first mistake. It rained on it the day after.

I ended up spraying the frame with some heavy duty anti-rust (one pint of black, one pint of amber (should've read the label perhaps to make sure Eastwood send the right colors)) about an hour before having to finish packing for the flight home. In my rush to spray it, I had ran out of acetone so I had to use mineral spirits - second mistake.

You see, painting it in the garage wouldn't required me to do too much taping. I probably could've gotten all I needed done in less than an hour - an hour I didn't have before getting on the plane. And acetone is used to clean the metal of all dirt, dust, and grease before painting. Mineral spirits is good for grease, dirt, and dust, but it doesn't vaporize like acetone, it stays on the metal. I wiped the frame and left it sit in the sun for a good 15mins, ah that's good enough, besides I've still got some underwear to pack for the trip home. We're good. No worries. I don't need to put it in the garage and I can use mineral spirits.

So where did it go wrong? Let's see, it rained the next day for one. When we got back 4 days later the paint was still tacky to the touch. Damn. Perhaps the mineral spirits was still under the paint and didn't allow the paint to cure. Damn. Good thing mineral spirits takes off paint too. The paint never did cure. I ended up stripping all the paint I had just sprayed, while in the comfort of the garage.

Should've read those paint directions a bit more closely. Oh, so it's supposed to have a clean and DRY surface before spraying. Good to know.

Tuesday, August 7, 2012

About that Prius

So I didn't want to steal my LC post away too much by talking about the Prius purchase. I know it's very yuppy of me to talk about buying a Prius. Allow me to disclose - I am so not a yuppy, I don't have a trust fund, I don't like wearing polos with little horses on my chest, I don't know how to play croquet, and I'm quite terrible at golf, but I do like efficiency.

I've filled it up 4 times now and I have yet to put more than 8.5 gallons in the 10 gallon tank, which equates to less than $30 thank you. You can argue all about the environmental impacts of the batteries - I won't argue. You can argue all about buying a cheaper, used car that gets 40mpg - I won't argue. I wanted a Prius so I could have an extra battery pack installed and so I could run pure ev (electric vehicle). There's a local company that adds packs and then allows you to run many miles on just battery alone. I believe in diversification.

Once I get the truck done, I'll have a diesel that is capable of running on veggie oil, a Subaru for gasoline, and then a hybrid. Perhaps I'll start a Prius blog when I get the truck all done. I could talk about all the benefits of running pure ev for my 24 mile round trip commute. Maybe after that blog I could start one about the benefits of capturing rain water or canning or using natural deodorant (or none at all)...

So about that Prius, I'm at the dealership negotiating my poor, injured TSX. I'm an honest fellow, so I don't lie about anything. I tell them everything. I'm a firm believer in you bring goodness into your life by believing in the goodness in others, so I didn't lie about anything. I told them all about the problems I'd just learned.
  • Them - $2900
  • Me - Oh no. Gotta do better than that. 
  • Them - Oh, we called around and we could do $3500
  • Me - What if I bring it from the Acura dealership to you to check it out? 
  • Them - Well we won't go below $3500, so it won't hurt you to bring it. 
  • Me - Ok, I'll be back. 
I pay my bill at the Acura dealership. They washed it for me or more accurately for the Toyota dealership, nice. I remember seeing the car come around the lot looking all clean and shiny. I took the wife over to the Prius to give her a run though on the controls while the porter brought my pretty car to a spot, of course he backs it up. I'm a backer-upper, too. I think it always makes a car look good when it's backed into a space. I kinda respected the guy for backing it up for me. Meanwhile, I'm talking to to the wife about this button and that and here's how you adjust the seat and I hear a strange sound. It sounded like he drove the front valence over a curb, but he wasn't parking it facing a curb... 

I turn around and see him frantically pull the car forward. 

Ah, comon! Are you kidding me??! I was not quiet. 

Yea, he wrecked my car. The car that I was trading in, trying to get the highest trade-in value I could, and the damn porter backed my car, my beloved car, into a pole. The passenger tail light was busted and the bumper was scraped. The porter suggested that he could use some touch-up to cover the bumper scrapes - ah, no dude, you're done. Keys please. 

After some loud talking in the dealership - I didn't cuss, but geez did I want to - the general manager came outside to assess the damage. They were good. He offered to buy it from me. He offered $4000. 

I guess I could've really taken advantage of the two dealerships, but as I said, I just don't think that way. 

The Toyota dealership offered $100 more to beat the Acura dealership - good for us. 

I was a bit hot after the exchange, but it really did work out for the best for us. I don't know if we'd gotten $4100 for the Acura had the porter used the mirror when backing up. The Toyota general manager really liked it. He said it was nicer than he figured it would be, so that was a nice little validation for me. I was so sad to see the Acura go, but I'm happy with the new purchase.


Thursday, July 26, 2012

Shifting Priorities

I just read through my last post. Geez, it's been over a month since I last updated my this blog. I feel as though I owe everyone an explanation. We're having a baby!

If you're a car builder you're likely thinking "Well that build is over" - not so fast. My wife is pretty ridiculously awesome. The only change in the build is now Proffitt's will have to fab up some baby seat anchors - that's it. I don't foresee me painting it now, so that's changed, but it's been my decision. I may get some cheap work done, but nothing too entailed. I think it'd be a waste not to take advantage of all the work that I did to disassemble it and not get it freshened up - maybe I just won't get a clear coat. I really like the flat dune beige look (it'd save me some $ too).

Moving on

As it stood - before the death in my family - my TSX has entered the great beyond. 
I've cleaned up the frame and cleaned up the frame and cleaned up the frame. I degreased everything. My hands could attest to the degreasing work. Degreasing removes grease - similar to fat in your body. My hands were tight (like I was wearing nitrile gloves that were one size too small) and red for about 2 days afterwords. I wire wheeled the hell out of it.

How cool is that?! I've always wanted something to pull apart and make better. I am so thankful that my wife let's me make a spectacle in the driveway. 

My super clean, super cool TSX is in the background! Pardon me while I wipe the tears out of my eyes. Geez, I miss that car.

I found my frame stampings under the grime on the passenger front side. 

I tried to catch the grease from the knuckles. What the catch pans didn't catch, the carpet scraps and tarp got (mostly).

I sanded the tough stuff off the frame. In hindsight, I would've been fine just cleaning it and wire brushing it. Sanding some areas and not other areas messed it up because I took it down to the bare metal and then I had to use rust convertor to cover the bare metal. If I would've painted it after I cleaned and wire wheeled and sanded it I would've been fine. I don't really work that way and here's why - 

In addition to the baby news, which we've known about since March, my Acura died on me. I loved my TSX. It was an '04 and had 150k, so it was no spring chicken, but it was paid off and looked good and ran good and I like it. I really had no intention of getting anything to replace the TSX. Until my a/c went hot.

My a/c has gone out before. I was lucky when it was a $25 switch that kept the cold air from the vents. I was lucky. I was hoping for luck again, but it was not to be. I dropped the TSX off at the dealer to have it checked out. I got the call about 45 minutes later - cue dark ominous tones.

Service Writer - You're a/c compressor is seized.
Me - Oh no.

SW - Yea, it doesn't get much worse. We're looking at about $1,200 parts and labor.
Me - Ohhh. (me thinking - I have to buy tires this summer which will be $700 if I'm lucky). Would that be it?

SS - Well, sometimes when compressors seize they send metal shaving throughout your a/c system.
Me - Sounds about right. How likely is metal shavings?

SW - Not too often. We wouldn't know until we get the new compressor in and if the system isn't charging then we'd have to start figuring out what else needs to be replaced.
Me - Oh no.

SW - Worst case, we could be looking up to $3,500 total.
Me - Oh no (me thinking - that's $4,200 for a car that is likely worth $7k if I'm lucky). Ok, we'll let you know.

I hung up and the wife and I had a talk over our eggs at The Buff in Boulder. We decided to see what we see. Maybe we'll get lucky. We already knew that we wanted a (deep breath) Prius.

I've wanted a Prius for a while now. Back in '08 we had one on loan for a few days from a local dealership. I could not get comfortable behind the wheel of that car - so we ended up with the TSX. I really liked the next generation when it came out in 2010. I liked the 2010 - more adjustability with the tilt/telescoping wheel and the adjusting seat pan height and the interior doesn't look like a concept from the 1980s.

I didn't want a basic package 2 or 3 Prius. I wanted a package 5 - with the 17in wheels, leather, HID headlights, navigation, bluetooth. We got lucky. The dealer had 2 - a black one w/ about 25k miles and a red one with 57k miles. We ended up with the red one. The previous owner bought the car from the dealership. We talked to the salesman who sold it to him. That guy owned 4 Pri before and was an older guy with no kids or dogs - good thing. The black one was just a mess.

I've never been afraid of miles. I'm afraid of poor condition. One look a the all terrain sport Michelin tires and I knew the red one was the better car. A helpful tip - no one puts sport tires on a Prius unless they recognize that it's important to put quality parts on your car. The black one had discount winter tires - nope.

Just brought it home. Red was about 3rd on the list of colors, but it's doable and I still like it. 
So we bring the Prius home to a full garage. One side was the body and the other side was the rolling chassis. I was planning on continuing to make a mess with the chassis, so it was time to move it to the area beside the house. Thankfully, I have an area that enclosed with privacy fencing, so I don't have to worry about my crabby, nosey neighbor.

It's been cleaned and cleaned and now rust convertor is sprayed over it - everywhere. 

I used the hose to (attempt) get all the dirt, gravel, everything from inside the frame. I tried using air too. I'm sure there's still 10lbs of dirt hidden inside the frame rails, but I got what I could with what I had so it is what it is. 

Before paint - after rust convertor. 
It's back in the garage now and painted. I've got my suspension and front-end rebuild kit. Geez, I've got so much work to do.

Sunday, June 3, 2012

And Then There Were Two

It has been a bit since my last update. Truthfully, it's really been just sitting in the ol' garage. We had some guests coming to the house, so I was kept busy getting ready. And by 'busy' I mean my 4-6hrs per week that I actually do work on the truck, instead I spent 2hrs procrastinating and 3-5hrs actually working on the house. If I spent half as much time actually working as I do thinking about working - I'd been done with this thing already. 

Ok, back to the work that I did, well my father-in-law and I did on the truck.

What's he going to do with that cherry picker? 
I'd thought and thought about how I was going to pull the body from the frame. Most guys do some sort of cinder block/ 2x4/ 4x4 post conglomeration where they jack up the body and slide the boards underneath then roll the chassis away. I'm not going to work on the body with it off the frame, but I have no interest in keeping my thousand pound body on a series of 2x4s and 4x4s on top of cinder blocks - sorry. I went one better - how about $7.99 rolling carts from Harbor Freight. More cheap tools, I know. My father-in-law rigged up some cribbing for the carts. I want to be able to move my body around my garage, if need be. Lesson learned on the cribbing - buy the boards you think you'll need then buy a few more, just in case. I had some extra 2x4s laying around that we were able to use, but there for a minute I thought I was going back to Home Depot to get some more and I hate having to leave a project mid sweat.

The rolling carts were rated by Chinese best and brightest at 1,000lbs a piece, so I thought with 4 of them with cribbing screwed to each cart we'd be in business - and we were. Once we got the body off the frame.

Rented leveler secured to the floor board via seat belt mounts 
So I rented the cherry picker from the same rental joint. I was hopping for more than 1,200lbs, but it was the best they had so I went with it. Thanks to some guys on the forums I learned that, likely, if I secured the hoist to the seat belt mounts I'd be able to lift it off the frame. Needless to say, so why say it, but here it goes, lifting an object without first finding the center of gravity is a long road to hoe. Not only was the pick point closer toward the front of the cab, but the back of the cab was way heavier, so pulling the cab was under less than favorable conditions.

We were able to get the cab off the chassis rather easily. We were able to get the height we needed from the cherry picker, so that was easy and good. The imbalance of the pick, though, made the job rather stressful. I thought we were going to lose it once and at that point in time I was pretty alright with the thought. The trouble was lifting the cab, which extends roughly 9inches lower than the frame, high enough to clear the rear tires and the fuel tank is attached to the body so it had to clear too.

We approached the pick from the passenger side, so it cleared the frame first, but it took some fiddling to make it. We had to lift and lift, but it kept just pulling the front higher and higher. The back was off the frame, but sagging down. Damn you gravity! We were able to seesaw the front driver side with the back passenger side to get it to clear. Thankfully, my rear driver side quarter panel was already a bit pushed in from the previous owner, so I wasn't too concerned when was had to skid it across the spare tire support bracket. Oh boy, it got hairy for a bit when the passenger side was cleared from the frame, while the driver side was hung up - it was the fuel tank. The point that was hung up in addition to the pick point caused the passenger side to dive toward the ground. Oh No! Desperate seesawing took place, but we kept it off the concrete. Until we had the carts positioned.

All four rolling carts, with cribbing in secured, in place. I wasn't too worried about keeping it level, but there are two carts in the back too. 
We were able to find better pick points once we got it down on the carts. Lesson learned - um, figure out the best pick points before pulling it - com'on Joe think. 
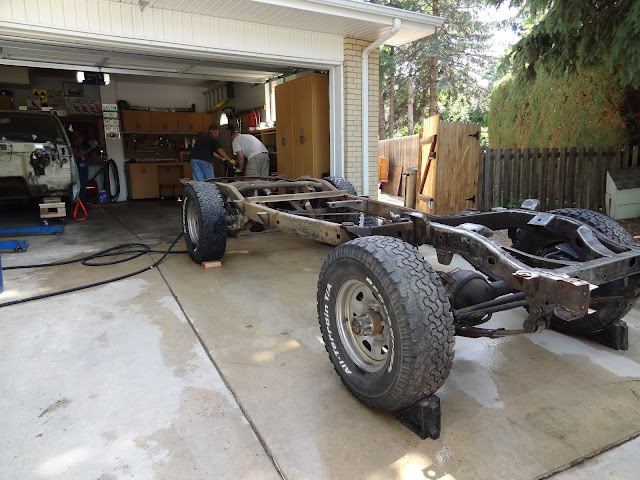
And then there were two!
After we got the body off, which took a bit longer than what I planned, but not bad. The seesawing was effective, but not the way I want to put it back on - I'll deal with it when I'm done with the frame and suspension. 

Now that we have the body off the frame, we had to pull the bellhousing off the block. My shop - Proffitt's Cruisers(!) is going to use the bellhousing with my H55 (5-speed) swap, but they need my bellhousing and flywheel and transfer case. The transfer case is for them - it has value for them, but the H55 will have the transfer case with it. 

The bellhousing took a lot longer than what I figured, but I had help for which I was/am so thankful. After we got all the work done it was time to clean up. I was ready to die afterwards. I know, I know, but I'll be the first to admit I was worked under the table. Working with my father-in-law made me think about working with my Dad. My father-in-law worked me under the table and so would've my Dad. It made me miss him. I was thinking of you Dad, promise, more often than not. 

Ok, that over and a bit teary, good news continues. 

I bought a motor and it's at Proffitt's waiting for MY truck. I bit of research with the State of Colorado, I learned that if I want to put in a diesel in my truck it has to be at least my year or newer and it can't be out of a heavy duty chassis - so no 3/4 ton or 1 ton or bread van w/ a 4bt Cummins. Guys can get away with it in other states, but not in Colorado. A light duty truck with a passenger car diesel, though, is alright! I bought a motor from a 1984 Mercedes Benz 300d - an OM617 turbo diesel Mercedes! 

It's a bit low on torque, but if the diesels that were available in Land Cruisers in 1984, such as mine, in Canada and Australia were 3B and 2H diesels - both of those diesel were lower in horsepower and torque and had a lower usable rpm range than the OM617. It won't be a monster, but it's perfect for the character of my build and I am extremely super excited to have it in my engine bay. 

Angie and I took some degreaser and scrubbie to the frame, so it's ready for getting the surface rust off. 

Sunday, May 6, 2012

A Place for Everything and Everything in it's Place

One step closer. One project checked off. 

The interior was begging me to get a heavy duty rust coat. I scuffed up the floor pan with the help of my cheap, very cheap, 4.5in grinder with wire brush. The best thing that happened was it broke. I should've known when I paid $10 for it and $15 for the wire brush that it wouldn't last too long. 

Harbor Freight Bad! DeWalt Good! The keyless chuck busted on the Harbor Freight the first time the wire brush hit the frame. It's like using a tool from the 40s then a tool from the future when using them back to back. 
I wiped everything down, taped the door jams, set the compressor to 50psi, and went to work. I got the heavy duty anti-rust and the rubberized undercoating in a kit that came with a gun and a couple lengths of wands to get inside the frame. 

The unpainted sections are sound deadening that was in place from the factory (thanks my friend Toyota Engineer), so decided to save my paint and not ... paint those sections. 
It took some time for me to figure out how to set the spray pattern, which was controlled by screwing in or out the nozzle. Adjusting the nozzle affected the flow, so too wide and slow = runs. Honestly, I wasn't too worried about runs in the floor board seeing as it'll all get covered up. It's learning time in Joe's garage. I may end up using this combination on my door jams,  so it's important to figure out the spray pattern vs. speed now. I can't cover up the door jams, except with the doors... 

I sprayed the anti-rust on Saturday and then the rubberized undercoating on Sunday. The undercoating was very similar to bedliner products. I'm not sure how well it's actually going to deaden road noise, like it's advertised, but I guess I could always put on another coat or two or three. 

Lesson Learned: 
Work slower. Be patient. Pay attention. Pay who? Attention! Pay attention! I'm no painter, because I don't want to take my time. It's funny isn't it? I have this truck nearly completely disassembled in my garage, parts all over my basement, bolts hidden in labeled ziplock baggies, and I don't want to take my time. It's just when it comes to actually putting paint down I'm so excited to see a result of some sort. I feel like this project has been little battles and I have yet to actually have something to show for my victories. Paint. Paint inside the truck - that's my victory. I just need to learn from this, because I'm not going to have carpet, seats, and trim panels to cover up my lack of patience. 

Not that you can tell, likely, but the rubberized undercoating is now down. 
Heavy-Duty Anti Rust, Rubberized Undercoating, Rust Encapulator, and the spray gun - neat huh? it screws down on the quart can. 
While I had the floor pans drying I tackled something Id' been dreading - taking off the steering gear and the brake and clutch lines. Let me recap something: I've nearly got a complete truck in my basement and I'm dreading taking off 3 lines that snaked along my firewall. I figured that I was dreading the task because I didn't have a defined location for the parts. 

Lesson Learned: 
I remember watching an episode of The Jetson's back in the day when I was so excited that I got to drive a riding lawnmower. Rosie, the robot maid, got some sort of wiring problem or something and went crazy. She would chant "a place for everything and everything in it's place". That robot was crazy! No wait, that robot was a genius! I just need to find a place for the bolts and lines, just like I've done for everything else on this project. Stop think and don't be a baby. 

Steering gear on the driver side of the frame and brake and clutch lines snaking along the firewall. What should I do with those things? 
I looked at the lines and steering gear like they were different than everything else I'd taken off the truck. I really don't know why. I just focused on the clamps and bolts - take them off Joe, geez. 

That's better and what did it take? A baggie for the bolts and some tape/marker to label the placement of the lines. 
TaDa! That looks better. The body's ready to come off. Well almost...